Pages

Monday, April 22, 2013

Worsted Bridie

We all struggle with our ever growing stash. In the past, I, like everyone else, just made accommodations to suit its inevitable growth. But this is going to change, my friends! I am getting rid of my stash, one skein at a time. How am I going to do that? I'm either going to make something out of the yarn, or I will give it away or toss it. No exceptions! No excuses! This is one of the first things I'm taking care of on my (very long) self-improvement list.

To start with my de-stashing, I started with four skeins of Borocco Ultra Alpaca worsted weight yarn in pink that was gifted to me. I'm usually not a pink person, but I needed a cute sweater to replace my thrift store sweater that is sadly, and very drastically, falling to pieces.

I started with searching on Ravelry for a sweater project in worsted weight. I just didn't find anything I really liked. There was a pattern in my Knit Knit book that I liked called "Bridie," but it calls for DK weight yarn.

So I turned to math.

I knit a gauge swatch with my worsted weight yarn on my size 5's and calculated that my gauge in worsted weight was about 4.5 stitches/inch as opposed to 5.5 stitches/inch as the pattern calls for. So I basically took all of the instructions in the pattern, and multiplied them by 0.8 (80%). "Cast on 56 stitches" then means "Cast on 44 stitches" (56 x 0.8 = 44). This is obviously a very simplified explanation  and there was a lot of trial and error involved, but it ended up working pretty well.

Of course, the joke's always on me. This project was intended to get rid of a bunch of yarn, but while I was finishing the last sleeve, I ran out. So that means I have to order some more so I can finish it. D'oh. I got desperate and disassembled my gauge swatch so I could finish the sleeve, and my friend D graciously ordered me another skein so that I can sew it up and do the button band.

Here are the finished pieces:
And by the way, this is Jorge! He certainly caught on quick that cats are supposed to get in the way as much as possible. He is the cutest, though. More about him on another day.
Here's a better picture:
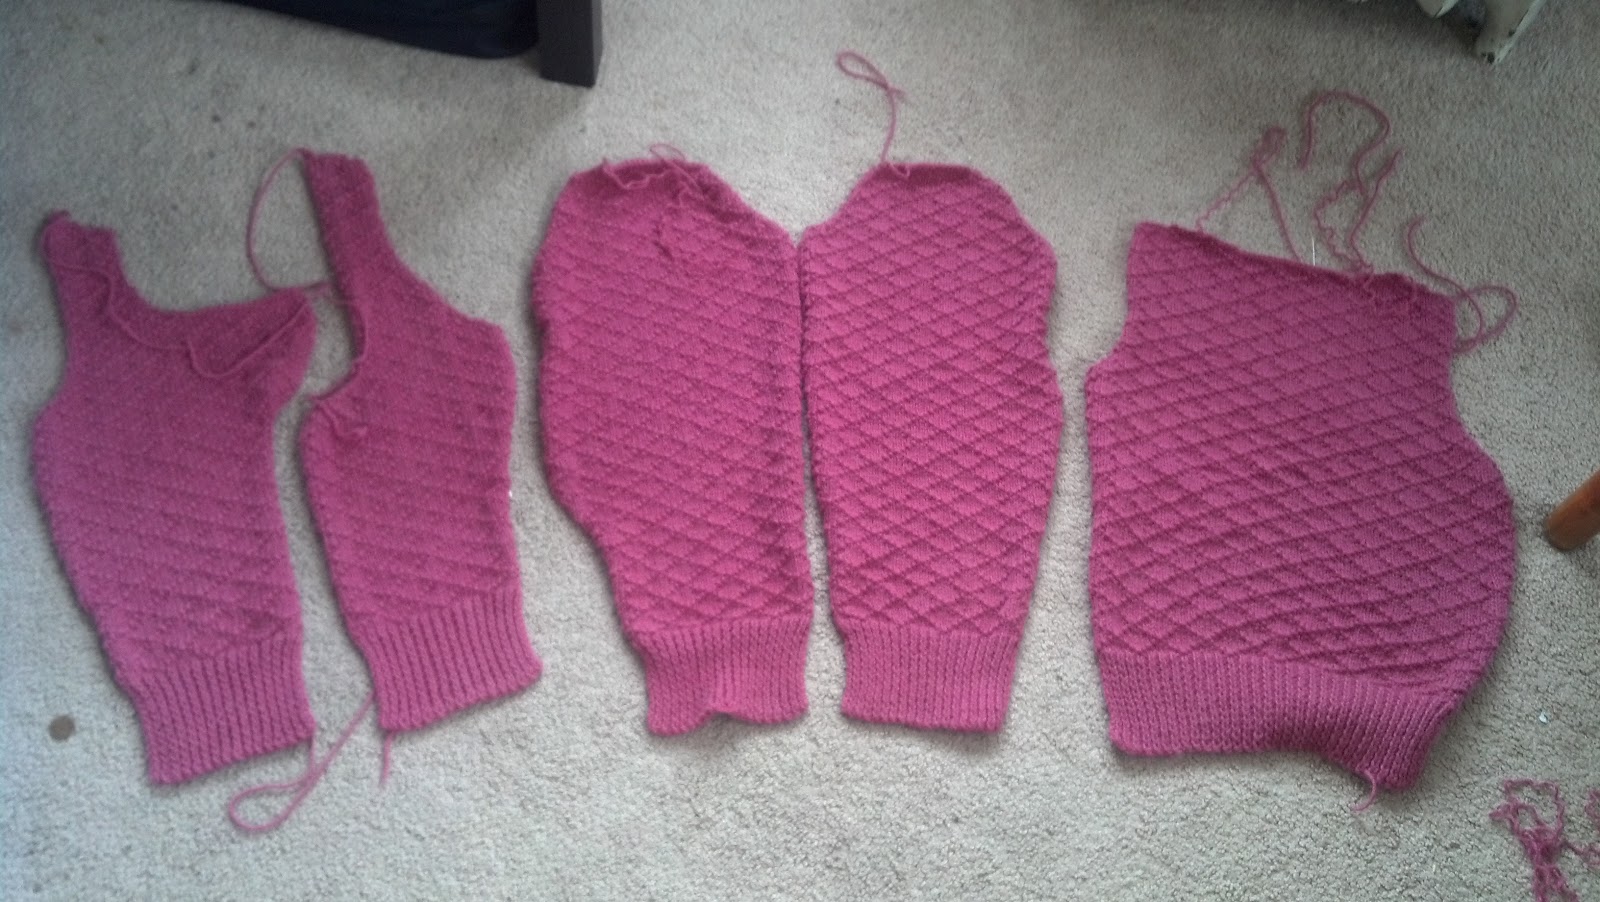
It is blocking as we speak and hopefully within the next few weeks it will be sewn up and finished.

Sunday, February 17, 2013

Hello Again

Well, hi. Here I am again. Since I haven't posted in a while, here's what I've been up to lately:

New Place
I moved into a neat house with 6 of my closest friends. It's an amazing historic house that's impossible to heat on a budget. I've got the best spot, the third floor flat. It's windows all around (no napping for me) and it has a great lake view.

I got an awesome new set of skis for Christmas!
So I've been out and about a bunch on those. I've also started dabbling in the sport of skijoring. If you've never heard of it (I think it's a midwestern thing) you should Google it, or YouTube search it, because it's fun to watch if nothing else. But basically I've been doing this by getting on my skis, taking my friend D's dogs to the park, and holding on for dear life. 
They don't look evil, but obviously looks can be deceiving. 
There is a more sophisticated method to it, however, and that usually involves getting some quality equipment. Skijoring set-ups like the Skijor Now and the Ruffwear kit cost between $150-$250. For me, that's a lot of money, but I really wanted it. I went back and forth on it, putting it in my Amazon shopping cart, taking it out, putting it back in again. One day I thought, hey, I could probably whip something together myself. Some nylon straps, some rope, some clasps, what else do you need? I set out to my usual first stop on my crafting tour, my parents' house. That's where I tell my mom what I'm planning on doing and she gives me materials if she has them, and coupons if she doesn't. However, when I got there, Mom was out so I explained to Dad what I wanted to do. He said, "Well it sounds like you just need a climbing harness." And yeah, that's pretty much exactly what I needed. Some people who skijor simply use a climbing harness that they already had, and it works well. Turns out Dad had his old climbing harness from his urban lumberjack* days that he was willing to part with.

I haven't tried it out yet, but I think it will work! It was free, and best of all, it looks totally badass! Yes that is real leather!
I'll be ready to go as soon as I get some snow :(

I'll do a post on all of my Christmas present projects soon.

*An urban lumberjack is what I call the guys who work for the city who come and trim and/or cut down trees if they're near power lines or what have you.

Friday, December 9, 2011

Second Sock Syndrome

I have fallen victim to the second sock syndrome. The second Java sock is coming along very slowly, which may have more to do with final exams than the syndrome, but I also finished a revised short sock:
The one on the left is the first attempt, and the one on the right is the revised version.

The revised version is done on size 6 DPNs and with one fewer pattern repeat on the foot. I also forgot about decided not to do the first two stockinette rows. You can see it fits much much much better. You can also see the size difference when they're not worn:
Above: First attempt
Below: Second attempt

Even though it takes only a few hours to do, I'm finding it hard to start the second one. I'm going to go ahead and blame that on the syndrome and not my own laziness.

But once I finish both second socks for the Java socks and Short socks, I will commence on the creation of the Inlay socks for Mom. Then the Circle socks. Then the Fuzzy hat. Then maybe I'll get some sleep.


Tuesday, November 29, 2011

Sock Update and Other Fun Things

Sock Update: I finished one of the Java Socks!
I love it so much! It's so soft and comfortable! The yarn is amazing, possibly my favorite ever. I will eventually make some for myself, but now I'm forging ahead on other Christmas gifts.

I thought I'd share some other cool things, too. First is what I've been using to transport my sock projects:

A Chinese-takeout box.  
It's great for a couple reasons. It easily contains my project and the accessories like a measuring tape and pattern. Also, as an advantage over a plastic or canvas bag, its rigidity prevents the tiny needles from snapping. I recently accidentally sat on and destroyed a couple of size 2 DPNs and was pretty devastated over it, which is why I searched for a reasonable alternative containment system. I think certain tupperware would work too, the trick is finding one that's long enough for needles. But it's always good to think creatively to repurpose something that is often thrown away.

Lastly, I was Christmas shopping at Bed Bath & Beyond and I saw this:
It's a sandwich cutter to make your sandwiches in the same of dinosaurs. It was too cute, I had to get it.

Fun fun fun!


Monday, November 21, 2011

The Good, the Bad, the Ugly, and then some more Good

The Good: I finished the Cadence Socks and they're awesome!
First Christmas present done! My sister will love these!

The Bad: I have a math exam tomorrow and I am totally unprepared!

The Ugly: The short socks are done...
wah waaaaah....
Ew.
Yuck. Get them away. Ew. Ew.

I'm pretty sure my only mistake was making them too big. I'm going to try again on 6's and see how that goes. Also, the pattern is obviously totally wrong about sizing. On these I did 9 iterations of the cable pattern (including the decreasing part), but I'd say for a size 7 foot or so to do 6 or 7 cable patterns (but maybe less on 6's, I'll let you know when I figure it out) But another sizing issue: the ankle is way too loose! My other sister would be like, "you made your other sister those amazing Cadence socks and I get these? You must hate me." So I'm not going to give her these socks. Because I don't hate her.
Maybe if you made these on 7's with thicker fluffier yarn they'd make good slippers, but now they're sort of ugly floppy useless sock/slipper hybrids. Another (necessary) deviation I made from the pattern is that I kitchener'd the toe shut, instead of pulling the yarn through the remaining 10 stitches.

The also-Good:
Instead of going back to the short socks, which I'm completely sick of, I forged ahead and started the Java Socks for sister's room mate #1:

Now this is what I thought sock-knitting would be like before I started. The Cadence socks were really easy and went really quickly. These socks however, they're just inching along. This yarn is much finer and I'm actually sticking to the size 1's. But they are oh-so-soft! 

Here's my game plan: The pattern said the leg is 6.5 inches long. Each iteration of the pattern (4 rows) is about a half an inch long. If I do 4 iterations of the pattern (about 2 inches) per day, I'll be done with the leg in a few days. Not bad. My problem is that this weekend is Thanksgiving, and my whole family will be together. This by itself is not a bad thing, but that means I can't work on any family-related projects, because then they'd see their gift before it's done and that would ruin everything. So I have to strategically work on certain projects while certain people are not around. I can work on the short socks on the way to Thanksgiving, because sister #2 won't be in the car, and I can work on the Java Socks at the party while sister #2 is around, and maybe I'll work on the fuzzy hat if my dad isn't around at some point.

I also need to come up with a gift for my mom. I really want her gift to be like a grand finale to the Christmas 2011 gift collection, but I can't find anything spectacular (and yet doable) enough. It's hard to browse patterns on Ravelry when I have 3 projects going at once. It makes me feel guilty. There are just too many fun things to do and no time at all to do them!


Tuesday, November 8, 2011

More Christmas Projects / Annoyances Part 2

I know it's probably the last thing I need to be doing right now, but I was testing out this fleecing technique used in this fleeced earflap hat because I bought some roving at the farmers' market and it just looked like SO MUCH FUN! And I assure you, the fluffiness and warm cuddly feeling that this little swatch gave me is getting me really excited to actually start this project. Here's a picture of what would be the "front flap" of the earflap hat made with Cascade Eco Wool and some truly fantastic roving from Wisconsin Highland Farms*.
Holy fluffiness!

Mmmm so soft! I love it!

But here's the thing. My priority list is as follows:
1. Study for my exam this week
2. Study for my exam next week
3. Finish the short socks
4. Finish the Cadence socks
5. Earflap hat

So you see here, this hat currently falls as #5 on my priority list, although I think taking out my giant pile of recycling should be up there, too. ANNOYING. 

Now, back to the short socks. Here's where I'm at:
Now, I selected the size 5 - 6 1/2 because my sisters and I have small feet. However, the pattern says to continue the sock 7 inches from where the heel flap diverges from the rest of the sock. But my foot is only about 6 inches longer, and then you need to factor in the toe decreases, right? My gauge is not off, how can this pattern be more than an inch off? And the toe decreases have to be at least 10 rows long! How ANNOYING. 


* Here's a shout-out to Wisconsin Highland Farms:

Wisconsin Highland Farms, LTD. 
Ann & Steve Herr, Owners 
2428 S. Dickey Road - Broadhead, WI 53520 
608-897-4380 
ann.herr@hotmail.com


Monday, November 7, 2011

Fall Food

Ah, fall. Something about fall foods that seems like the entirety of summer was simply working towards the deliciousness of squash and apples. I was at the Dane County Farmers' Market this weekend, which happened to be the last outdoor farmers' market of the season, and I got some fantastic deals, including a grocery bag full of acorn squash for a couple bucks. Amazing! I shared some of my steals with some neighbors and started cooking some for myself immediately! Acorn squash is easy: just cut them in half, take out the "guts" and cook them face-down on a baking sheet until they're done. I set my oven to 375 and it took them about 30 minutes, but if you're going to try this you should probably consult some other source, because my oven frequently lies to me. It's a small, robust, antique-y looking thing. What I really need is an oven thermometer...

So what to do with the seeds? I usually just compost them with the rest of the squash insides. This time, I tried roasting them. After I scooped them out of the squash, I pulled the extra stuff off the seeds and rinsed them. This can be tricky! They are slippery little tiny tricksters. Then I dried them off with some paper towels.
Here they are sans gooey stuff and rinsed.

Then I added some olive oil, just enough to coat (a few tablespoons) and some salt, garlic powder, and some paprika. I spred them out on some parchment paper on a baking sheet and set the oven to 300.

I took them out after 15 minutes and tossed them, then put them back in for another 15. You could probably leave them in longer and make them crispier if you wanted to.
Yum! When I'm home alone doing homework, these go fast! They almost taste like sunflower seeds.


On another food-related note, I got one of these fancy coffee makers for my birthday:
Hellooooo caffeine addiction.
These things are just amazing. I've already had two of these today (too much, Anna?) and it is pretty tasty. Flavored coffee is really not my thing, but from the variety-pack I tried a vanilla flavored coffee, and when it is hot and fresh this stuff is good. Highly recommended to people who are busy, lazy, or both (like me). 


Saturday, November 5, 2011

Annoyances

A couple things are annoying me right now. Yes, it's almost 2 A.M. which might explain most, if not all, of my menial complains, but I will share them with you anyways:

Cadence Socks:
Almost done. Yeah, almost. Because I ran out of yarn. At the toe of the second sock. That means I'll have to go buy another skein of this (expensive) yarn just to finish the toe! Then what am I going to do with the rest??? UGH. Look at it! It's just screaming "finish me! finish me!"

So, facing this tragedy, I started on socks for sister #2. I spotted this pattern a while back, the unoriginally titled "short socks." It almost sounds too good to be true. Socks on size 7's? Who has heard of such a thing? After doing the Cadence Socks on size 2's, I was so shocked to have to re-acclimate myself to the 7's.
What a monstrosity! You could whack someone over the head with these giant pillars of wood and kill them instantly.


The execution is easy enough, except for the pattern is complete gibberish. It's like one painfully long run-on sentence with random, unnecessary punctuation AND CAPS LOCK. "REMEMBER THE GUAGE!" it screams at you in the middle of a paragraph. Why? Shouldn't I have theoretically checked the gauge before starting? Even if I didn't, (I hardly ever do) why on earth would I check it now? You don't give the gauge for ribbing!
"NOTE: This pattern is written in American English. All measurements in charts are in cm."
Really? Does that make sense? It doesn't to me, but that might be the result of a lack of sleep on my part. 
In a more realistic sense of complaints: thrown in here and there are vague terms like "rib" which is supposed to imply 3x3 ribbing. The charts are also not the best. 


</whining>


It's decided: everyone is getting socks this year. I have sock fever! Except for Dad, who is getting this hat.

Monday, October 31, 2011

Socks!

The never-ending sweater project is once again on hold as I make Christmas presents for my family and friends. First up: my sister who specifically requested socks. I've honestly never made adult-sized socks before, so I was very intimidated. I was expecting to spend a fair amount of time on them, which is why I started in October. But I got on a roll and finished one in a matter of a couple of days! They are the Cadence Socks and here's one done:
Boy, that's not a very good picture... but you get the idea.
It's a very fun project. I originally bought two skeins of Classic Elite Fresco, but to finish off the toe of the first sock I had to tap into the second skein. But it was just the end of the toe, I hope I don't run out!

I started making the socks on size 1 DPNs but they came out way too small, so I restarted on 2's. The socks are a little big for me, but I think they'll fit my sister perfectly. (I hope she doesn't read this...)

Next, I'm starting more socks for my sister's room mates, the Circle Socks and Java Socks. Socks socks socks! Turns out, I'm pretty good at them!

Sunday, October 16, 2011

Madison Knitters' Guild

Last Monday I went to my first Madison Knitters' Guild meeting. I can't believe I haven't gone before! It was tons of fun. They brought in Susan Anderson and the makers of Spud & Chloe yarn. I LOVE Spud & Chloe yarn! It's what I made my ducky socks out of. It was a great point to jump in, Susan is wonderful to listen to. And we got some gifts! We got this adorable heart shaped tape measure:

And a little canvas bag with two patterns!

Amazing! I also loved the show and tell, there are some seriously talented knitters and spinners in Madison. At the next meeting I'm totally showing off my deer hat and hopefully my sweater will be done by then too! And maybe even my Aidez as well! We'll see. I've got this silly math midterm the day after tomorrow that I'm getting really annoyed with.

Monday, October 3, 2011

Sweater Take 2

I ripped up the sweater pretty far. It was hard to do. Here's what it looks like now:


But one advantage of moving is being forced to go through all your stuff, so I recently found my bamboo size 6 DPN's so I don't have to deal with these clunky metal ones:
Lighter and shorter.

After ripping I started with the sleeves first. I also decreased the stitches in the arm by 6. The shorter needles and the fewer stitches means this is going a lot faster now.

Even though I'm making the sweater smaller this time around, I'll probably still need more yarn. I made this Aidez sweater out of recycled yarn a while ago, but towards the end I ran out (story of my life, I know) so I used this sweater's brown yarn for the last bit. But since I need it now, I unraveled the brown bit from the Aidez sweater. I assembled it really poorly in the first place, so it's not like I could wear it around anyways. Eventually though, I'll finish and re-assemble the Aidez. Here's pictures of it before the ripping:


Notice the big holes...

So here's to getting it right! Hooray for ripping!

Monday, September 19, 2011

Sweater Update

No, I'm not done yet. And it looks like I wont be for a while...
Here's where I'm at:
I have one sleeve completely done, and one mostly done. I have the body done to the pattern specs (except the hem, which I can't figure out) but I think it looks bad. It in no way fits my body, which I admit is pretty unusually-sized.
 The body needs to be a lot narrower and longer.
 The sleeves could be narrower, too.

I was thinking that maybe I could give it away to someone else, but now I'm completely sure I will not have enough yarn. Plus, I hate trying to give things away that I spent so much time on, because then if the receiver doesn't like it, they'll feel bad that I put so much effort into it and wear it sometimes out of pity. It's a lose-lose. I think it will eventually be a pretty sweater, but it isn't going to be finished for a long time. And that means I'll probably get distracted by other projects, and maybe occasionally school work.

Monday, September 12, 2011

Racoon Hat

This is the very first pattern that I've come up with and shared with everyone. Please don't laugh!

It's a striped hat that's squared off to give the impression of ears. At least I think so!


Needles: US Size 9 (5.5mm) 16" and DPN's, or do the whole thing on DPN's.

Gauge: 4 stitches per inch

Yarn: Cascade Yarn Ecological Wool of any two colors, or any yarn that works with the gauge.

Other supplies: Stitch markers, yarn needle

Abbreviations:
     CO = cast on
     pm = place marker
     sm = slip marker

Directions:
CO 72 stitches using long-tail cast on. Place marker at the beginning of the row and...

Knit!

Now I made my stripes 9 rows each, or somewhere between 1.75" and 2". You can make yours as long as you want!

Keep knitting in stockinette until the piece is 7" long. This happened to be the beginning of my 5th and last stripe.

Decreases:
Row 1: K 16, pm, K 4, pm, K 32, pm, K 4, pm, K to end of row
Row 2: *K to 2nd to last stitch before marker, K2tog, sm, K4, sm, ssk* repeat once more and K to the end of the row
Row 3: Knit
Repeat Row 2 and Row 3 three more times. You can switch to DPN's at any time if you like.

Slip the first 14 stitches and the last 14 stitches of the piece onto one DPN, and slip the other 28 stitches onto another DPN. Sew stitches together using kitchener stitch. (I found this video very helpful)

Weave in the ends.

There you go!

Catching Up

As of a few hours ago, I officially unpacked the last box from my move. Yes, it took me a few weeks but it's better late than never. I have completed a few smaller projects, having put my sweater project on hold. First is this buttoned scarf/cowl/thing:

I deviated from the pattern in that instead of doing a knit row for the second pattern row, I did a purl row to keep it in stockinette. I did this to make it look neater, because the garter stitch-style pattern looked way too messy with this yarn.

Second project: the deer with antlers hat. I used yarn that I had on hand, so I don't think it looks ideal, but it's cute! The antlers, when I felted them as directed, really didn't shrink that much.

Second project PART 2: the deer with antlers hat done a little better. I bought some yarn specifically for the project and I like this one better. (You can check out the specific yarns I used on my project pages on Ravelry.) For this hat's antlers, I felted them as directed and THEN stuck them in the dryer on high with some other laundry for about 30 minutes. This shrunk them a little more and made them significantly stiffer.

Third project: I will create a new post for this because it's a pattern that I came up with myself, so I want to share the pattern with everyone!

Now that I'm all done being distracted, I'm going to finish that sweater. I REALLY AM!!! I might have to steal back some yarn from my recycled Aidez sweater, but I can always redo that one. I will finish this sweater.

Wednesday, August 17, 2011

Moving, etc.

So I haven't posted in a while because I've been busy moving to a new part of town. It's pretty neat, and I'll post some cool things about that later. But for now, some house-keeping.

My sweater is on hold because 1) I'm pretty sure I'm going to run out of yarn and 2) I'm almost certain it will not fit me and lastly 3) I'm kind of bored with it. A while ago I bought this deer hat pattern, and I actually bought yarn to start it but I lost it.


A friend gave me this nice colorful alpaca yarn, and I started making these hand-warmers, which I intended on just finishing off into real mittens, but this pattern has given me some grief.

Whaaaaat happened here??? I don't know. I messed up somewhere. But the biggest problem is that the bound-off stitches didn't match up with the yarn overs. Maybe I was just tired from unpacking and forgot how to read.


Is that a thumb hole?


The yarn didn't stripe as well as I thought it would anyways, so I'm looking for another project to use it on.


Tuesday, July 5, 2011

Google+

Google+: Facebook but classier.

I remember when I first joined Facebook. I liked how simple it was. Then it got less exclusive and more annoying. I think it's going the way of MySpace. I stopped putting my pictures on Facebook because of the awful privacy rules. I instead started using Picasa, but it was difficult to manage who is able to see my pictures. Now with Google+, that's really easy.

Now Google rules my life. Let's hope this turns out well.

Thursday, June 30, 2011

Duckie

So, the sweater is slow going because I'm on the sleeves now, and it's just straight stockinette for the whole thing, and my attention span is pretty mediocre.

I'm taking a break to make these duck socks, because my boss is having a baby.

In the sweater from-the-neck-down class that I took, everyone was making baby/child sweaters, except for me. So while most people were on step 3 or 4, I was still stuck at step 1 because it takes so much longer to make an adult-sized sweater. I was so jealous of those other people. All the satisfaction of making a sweater, with a fraction of the time and effort. But I didn't know any babies or small children at the time, so I had no choice.

But now I know a baby. Or I will very soon. I've never made anything for a baby before, and I've also never made socks before. So this project will by doubly challenging.

The project so far has been pretty fun, but difficult. I didn't bother with the "magic" cast-on, and when I got to the Turkish cast-on part, I was just like "pffft... I can do this an easier way." So I tried k1fb to do the increases, until I got to the part where you do 12 increases at once. Yeah... that was a little tricky. I went back and actually learned the Turkish cast-on and guess what: it's totally easy! I was just over-thinking it. My advice: don't try to do it while reading the directions. Read the supplemental directions over once, then attempt it while looking at the example pictures in the pattern. The Turkish cast-on makes a lot of sense for this project.

I did the whole thing on dpn's, because I started out with no size 2 needles, and buying one set of dpn's was cheaper than buying a set of dpn's and two sets of circulars. But if I ever do this project or anything like it again, I will certainly get the circulars. I definitely got the gaps with the Turkish cast on as described on the Ravelry page, but that's almost certainly due to the fact that I used the dpn's throughout.

The applied I-cord is a pretty ingenious design. That's where I'm at now. I really need to hurry up though, because I wanted to give them to my boss before the baby arrived, and this baby is coming out any day now.

I am so obsessed with how cute these socks are. Here's one done!

I took this next picture when I was working the applied I-cord. I think this picture illustrates how much better it looks with the I-cord. It goes from having a messy-looking seam to looking like a real ducky foot!

In summary: I-cord is awesome. Ducky socks are extremely cute. I cannot wait to see how cute they look on the baby!

Friday, June 10, 2011

New Yarn!

As I've mentioned before, I love new yarn. Recycling is great, but nothing beats the feel of brand-new yarn. However, I rarely have enough money to buy new yarn for a big project. Well, someone who works in the Chemistry department with me is also a knitter, and bought a bunch of yarn for a blanket. She then discovered she hated the yarn, so she just gave it all to me! For free! I thought, wow, awesome, free brand new yarn. Well, let's take a look:

And there it is. Six skeins of Lion Brand Micro-Spun yarn of various colors. At first glance it's easy to figure out why it was given to me for free. It becomes un-spun at the drop of a hat.

 And I don't mean to be pretentious here but... it's acrylic so... yeah, ew. 

I'll still use it, that's for sure. For what, who knows. I'm a couple days into the Middlefield Sweater and I'm working about midway down the body of it so it will be a while before I can think of starting to use this stuff.

Speaking of the sweater, I'm starting to regret my haste in starting this project. It's pretty clear that there's a good chance I will run out of yarn, and since it's just from a taken-apart old sweater, there is no more. Making sweaters, especially from the neck-down I think, are arduous tasks. I'm afraid I will get to the second sleeve and then discover I'm out of yarn. Then I have to take it apart, again. That just sounds traumatic. We'll see, I guess! So far it's an easy sweater, though. Looking ahead, there's a fancy seam that I've never seen before. More on that when I get there.